Understanding the inspection process for drilling tubulars
A thorough inspection process of drilling tubulars is required to be sure they meet the criteria for the job and is vital for maintaining the flow of operation. Inspection can help foresee any future problems before damage to the tubulars becomes critical, thus preventing costly repair bills, environmental damage and most importantly, injury to personnel. In this post we’re going to look at some of the standards, methods and techniques used in the inspection process.
Standards
Reliability of inspection process depends on standards. These are used to ensure reproducible results during the drill pipe inspection and also helps us compare results and make decisions on acceptance/rejection. Ensuring all figures, dimensions and tolerances are complied to within these requirements is an important factor in assuring the tubulars are fit for use.
Globally, some inspection standards apply depending on customer requirements in different drilling areas. These include:
- API RP 7G/2: Recommended practice for Inspection and Classification of used Drill Stem Elements
- DS-1 Volume 3: Drill Stem Inspection
- NS-2 Drillstring Inspection Standard
Methods of inspection
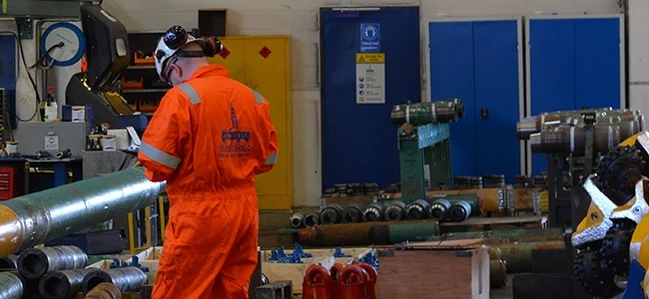
Non Destructive Testing (NDT) is used to inspect the tubulars. The inspector will look at high-stress areas, including threads, slip areas, weld areas and radius changes, to detect if any fatigue or cracks have occurred in the pipe. There is some inspection that can be done in the field, eg. visual and dimensional inspection, internal conditions of the pipes and hardbanding. To cover all methods, testing needs to be completed in the yard as a line flow is required for the inspection to be cost effective.
Many methods are used during the inspection process, including:
- Visual inspection (VTI)
- API/RSC thread inspection (API-TI)
- Dimensional inspection (DI)
- Electromagnetic tubular inspections (EMI)
- Magnetic particle (MT)
- Liquid dye penetrant (PT)
- Ultrasonic inspection of rotary-shouldered connections (UT-RSC)
- Ultrasonic inspection of high-stress areas and tube upsets (UTEA)
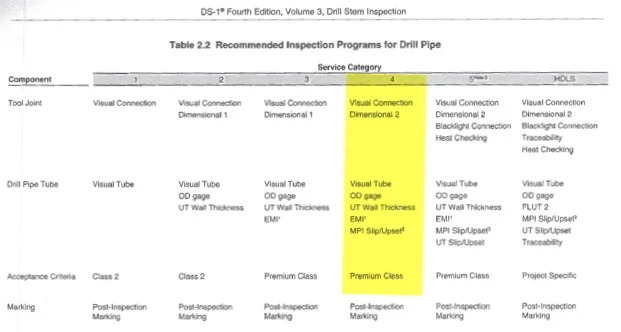
Inspection methods for drill pipe according to the Standard DS1 Vol3. For example if category 4 is requested, all the methods highlighted in yellow need to be performed on the pipe.
What do we look for when inspecting?
- Crack indications in threads
- Crack indication in box connections
- Crack indication in outside upsets
- Galled threads
- Pulled threads
- Overtorqued threads
- Galled seals
- Seal damage to shoulders
- Pitting/corrosion
- Washout in connection
How often should drill pipe inspection take place?
There is no definitive answer to this question. It really depends on the conditions you’re drilling in. When drilling in a shallow well, the pipes are not exposed to a great deal of fatigue, so less frequent inspection is required. On the other hand, deep well drilling could result in more stress to the pipe and inspection periods will need to be shorter.
The forth edition of DS1 states:
The usual practice has been to set inspection frequency on some arbitrary basis such as footage drilled or hours rotated. Such estimates are little better than wild guesses because they don’t take into account how the components in question are loaded. Neither do they consider the probable failure modes.
Considerations for scheduling re-inspection
Given that the initial inspection was correctly done, the factors that should determine when re-inspection is needed are accumulated fatigue and accumulated wear:
- Fatigue: Accumulated fatigue damage on drill pipe tubes should determine when to schedule a re-inspection
- Load capacity: Load capacity will be affected by wear on tool joints and tube bodies. Therefore, scheduling inspections for overload considerations should be done on the basis of cumulative wear
A good practice and one we use at OWS, is to inspect all the pipes on return after each job. This method ensures top quality equipment is ready and provided to the next customer.
What happens after inspection?
When inspection has concluded the pipes are categorized into classes. If the box OD and tube wall thickness is no less than 80% from the new dimension we could categorize the pipes as Premium, anything less would need to be downgraded to class 2. Lower classes can be used, but as the class goes down, so does the scope of jobs they can be used on. At OWS we only use Premium Class tubulars, anything less and we scrap it.
Prevent that NPT!
As I’ve stated, thorough inspection is vital. The pipes need to be able to take the load capacity, the thread dimensions must be correct and fatigue needs to be eliminated. Failure to do so could result in the drill string coming apart and anything that’s left would need to be fished out of the hole or (if you are unlucky) be left in the hole. All this results in a lot of Non Productive Time (NPT) with very expensive consequences. Something none of us want!
> See also: How to choose the right drill pipe.

By: Alexandru Pusca
Alexandru has been in the business for over 15 years and has been at Odfjell since 2011. He is Rental Supervisor for Odfjell Romania.