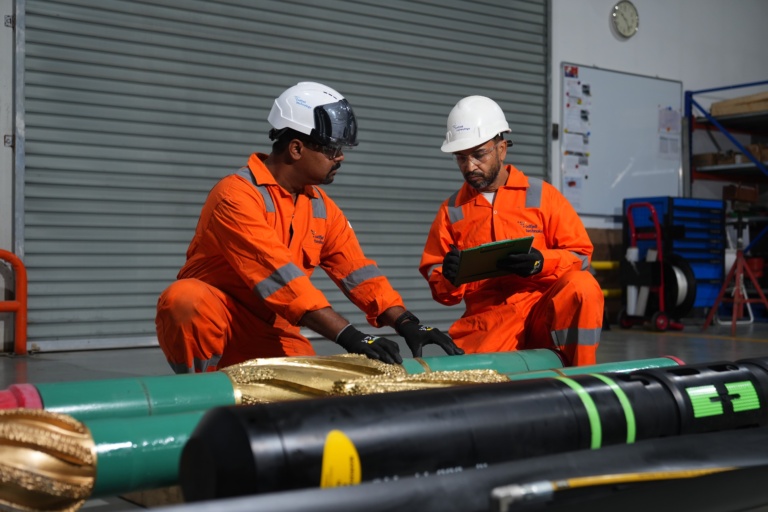
The correct use of safety clamps
In one of my previous articles I spoke about the use of slips.
Understanding the operation of the slips will make you understand the purpose of the safety clamp. Why do we use it in our daily operations on the drill floor, whether we run Drill Pipe, Casing or Tubing?
How it works
As the name states, it is a “safety” device. It’s an extra effort to prevent a single joint or a complete string of pipe from dropping down the hole.
When a drill- or casing crew starts running the first pipes in the hole, little weight is transferred to the slips. The slips are tapered conform with the rotary bushings and they won’t sink in very deep. Once weight increases, the slips will set more firmly with a more aggressive bite on the pipe. With little pipe weight in the slips, they are not biting the pipe sufficiently, and there is a risk of slippage.
This is where the safety clamp enters the scene. It is a device built up of segments with spring loaded dies (shock absorbing). When the pipe is slipping in the slips, the safety clamp will absorb the impact on the top of the slips forcing them deeper in the rotary, preventing the pipe to drop down the hole.
No banging on the clamps, please!
A big misconception of the safety clamp is the majority of rig crew’s belief that you need to tighten the clamp up to its maximum limit (banging with a sledge hammer). This is bad practice. When this is done, the clamp becomes too tight and the springs behind the dies will be compressed. The safety clamp will lose its ability to absorb a shock load should it impact on the slips.
Safety clamps do’s and don’ts
- Usually the safety clamp is used until sufficient weight is reached in the string. This will vary according to tubular specs.
- The safety clamp shall be used for an entire string if the Casing/Tubing/Drill pipe is flush, meaning no upset or coupling.

- Do not use a safety clamp in combination with automated slips. This does not create a safety factor but becomes a hazard. When using automated slips, and you install a manual safety clamp, you will risk major equipment damage should you encounter an impact. Even though Company Rep’s might insist in using the clamp in this configuration, it is strongly recommended not to do this.
- Do not ever use a safety clamp as a hoisting device. This device was not build for lifting and is not rated as such. The handles on the clamp are for manual handling, not to be used as pad eyes.
- Do not ever use a Single Joint Elevator as a “safety clamp” … This might seem a quicker solution than installing the real clamp, however is not designed for that purpose and could result in serious equipment damage.
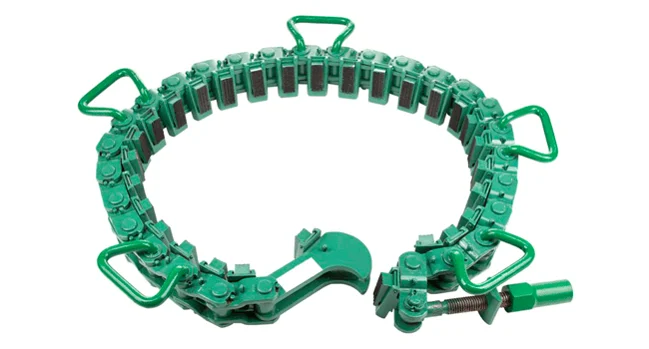
Different models & makes
The safety clamps basically come in three different types, and are manufactured by various companies around the globe. The most common name on the drill floor is “Dog Collar”.
Again, as I have highlighted in the blog on slips, avoid mixing parts from one manufacturer with the other, even though they might seem compatible. Warranty on the tool is gone, and as tolerances on the parts might slightly differ, you could end up in a world of hurt.
When we speak about safety clamps, we can divide them in three categories. The smallest size being a “T” Type, the intermediate & larger sized clamp is type “C” and there is the “MP” type which stands for Multi-Purpose. The “C” & “MP” type overlap each other in sizes, however the “MP” is generally heavier and harder to handle.
Topics: Casing Running

By: Robert Koendering
Robert has 15 years experience in tubular running services which comprises pile driving, running casing & high chrome completions, bucking & pressure testing. He is an expert on top drive casing running tools & DwC operations (Level 2).